Category Archives: Tidbits

Super Brownies for the Super Bowl

It’s been a busy couple of months around the Kitchen, with the holidays and wedding planning taking up much of our time.  This past week was my birthday, and Mr. Kitchen got me an awesome present — a gift certificate for a workshop with DessertTruck here in NYC, where I will be learning to make macaroons!

Since it’s Super Bowl Sunday, I wanted to pass along a new recipe for these fantastic brownies — with three types of chocolate (baker’s unsweetened, dark, and semi-sweet) and a generous heaping of peanut butter, they’re not too sweet but incredibly rich.

They don’t take long to make, so if you’re planning to head to a party for this evening’s 6:30 kick off, you’ve still got time!

Peanut Butter Chocolate Brownies

Triple Chocolate Peanut Butter Brownies

Triple Chocolate Peanut Butter Brownies

Adapted from a Martha Stewart Recipe

The Batter 

1 stick butter, cut into small pieces, plus more for buttering baking pan

2 ounces unsweetened chocolate (Baker’s provides 1 oz squares, if you’re using a bar, chop the chocolate into chunks)

1 ounce dark chocolate

4 ounces semisweet chocolate morsels,  plus an extra 2 ounces for chocolate chunks in the brownies

2/3 cup all-purpose flour

1/2 teaspoon baking powder

3/4 cup granulated sugar

3 large eggs

1 tablespoon pure vanilla extract

Peanut Butter Mixture

1/2 stick of butter (melted)

1/2 cup confectioners’ sugar

3/4 cup smooth peanut butter

1 teaspoon pure vanilla extract

Preheat oven to 325 degrees.  Butter an 8-inch square baking pan.

Put butter in a double-boiler (set a heatproof over a pan of simmering water).  Stir until melted and add chocolate (unsweetened, dark and 4 ounces of the semi sweet morsels), mixing until the chocolate is fully melted and incorporated into the butter. Let cool slightly.

Whisk granulated sugar into chocolate mixture. Add eggs, and whisk until mixture is smooth. Stir in vanilla.

In a separate bowl, whisk together flour and baking powder and add flour mixture to chocolate mixture.  Stir until well incorporated (about 3-4 minutes).   Stir in the remaining chocolate morsels.

To make the peanut butter swirl mixture, stir together butter, confectioners’ sugar, peanut butter, and vanilla in a bowl until smooth.  I’ve found that melting the butter in a double boiler, adding the sugar and then the peanut butter and whisking together works well.  Just be sure to let the butter cool slightly before adding everything else. 

When pouring the batter and peanut butter filling, you’ll have to work quickly.  Pour one-half the batter into the buttered pan and spread it evenly with a rubber spatula. Drop heaps of peanut butter filling (about 2 tablespoons each) on the batter, spacing about 1 inch apart. This should amount to about half the peanut butter filling.  Pour the remaining batter on top, and gently spread to fill pan. Drop heaps of remaining peanut butter filling on top. Gently swirl peanut butter filling into batter with a butter knife, running the knife lengthwise and crosswise, with the tip of the knife hitting the bottom of the pan.

Bake about 45-50 minutes in center rack of oven, until a cake tester or toothpick inserted into brownies comes out with a few crumbs but is not wet, about 45 minutes. Let cool in pan, slice and remove and let cool completely on a rack.  

A trick for cutting brownies:  Use a plastic knife! I don’t know why, but it stops the brownies from crumbling/cracking/falling apart while cutting.

Melting the chocolate for triple chocolate peanut butter brownies

Melting the chocolate for triple chocolate peanut butter brownies

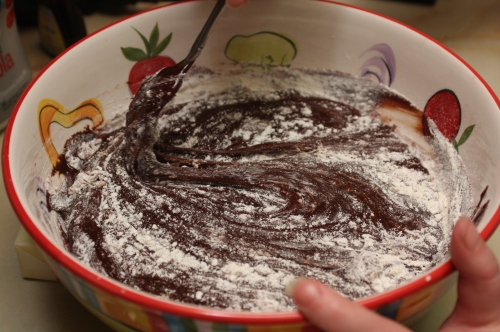
Mixing the batter for triple chocolate peanut butter brownies

Mixing the batter for triple chocolate peanut butter brownies

Mixing the peanut butter for triple chocolate peanut butter brownies

Mixing the peanut butter for triple chocolate peanut butter brownies

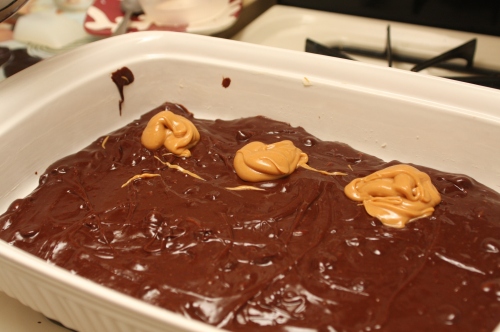
Mixing in the peanut butter for triple chocolate peanut butter brownies

Mixing in the peanut butter for triple chocolate peanut butter brownies

Pre-bake triple chocolate peanut butter brownies

Pre-bake triple chocolate peanut butter brownies

1 Comment

Filed under Baking, Desserts, Recipes, Tidbits, Uncategorized

Pumpkin Delicious

With Thanksgiving coming up, I have been all about the pumpkins.   Completely versatile, pumpkins can go savory or sweet and can be used in ravioli, risotto, pies, cakes, lattes — the list goes on and on.   Last year, for a “Pre-Thanksgiving” dinner with friends, I made a bourbon pumpkin cheesecake that was actually really easy and a fantastic addition to the fabulous spread of desserts we had.   I may make it again this year, perhaps with a salted caramel twist.  (I’ll admit, I’m easy prey for some of the food trends, but salted caramel is really just awesome.)  For our recent winery trip, I thought we might want sweet treats to go with the Empanadas so I made Spiced Pumpkin Doughnuts with a Maple Icing Glaze.  The confectioner sugar-based icing is the perfect complement to a well spiced pumpkin dough.  I’d never made doughnuts before and was pleasantly surprised by how easy they were to make.  The one tricky part was making sure that the shortening remained the right temperature.  Too hot and you burn the doughnuts — too cool and they become soggy and oily.  If you don’t have one, it’s best to invest in a candy/oil thermometer before trying to make the doughnuts.

Mr. Kitchen was my sous-chef on this one — we had a great time trying to make sure neither of us got third degree burns from splattering oil.   As Mr. Kitchen found out — it’s best to gently place the dough in the oil — dropping it in = nasty blisters.  There were the obligatory Dunkin Donuts “Time to make the donuts” references and lots of expletives as I grew impatient and tried rolling out the dough before it had totally chilled.  Don’t try that — it’s an exercise in futility.  Of course we just had to try the doughnuts out — you know, to make sure they were edible.  (I think we probably “tasted” half a dozen each.)  If this keeps up I’ll never fit in my wedding dress.


Pumpkin spice doughnuts with maple icing

Pumpkin spice doughnuts with maple icing

Pumpkin Spice Doughnuts With Maple Icing

Doughnuts  (Adapted from Better Homes and Gardens)

*This recipe makes over 20 small doughnuts (if you’re re-rolling out the doughnut holes)

2 tablespoons butter (softened)

1/2 cup sugar

2 teaspoons baking powder

1 tsp ground cinnamon

1/4 teaspoon baking soda

1/4 teaspoon ground ginger

1/4 teaspoon grated nutmeg

1/4 teaspoon ground cloves

1/2 cup pure pumpkin (canned is fine)

1/3 cup buttermilk

1 egg

1 egg yolk

2 tsp vanilla extract

2 cups all-purpose flour

Shortening for deep frying  (I think I probably used nearly half a container — you will want your shortening/oil to be at least an inch deep)

You will need a candy/oil thermometer for this for best results.

Maple Icing

2 2/3 cup confectioner’s sugar

4 tablespoons milk

1/4 teaspoon maple extract

The Doughnuts: In  a large bowl, beat butter with mixer on medium for about 1 minute.  Add the sugar, baking powder, cinnamon, baking soda, ginger, nutmeg and cloves.  Beat until combined.  Beat in pumpkin, buttermilk, egg and egg yolk, and vanilla until combined.  Using a wooden spoon or a spatula, stir in flour until well combined.  Cover and chill for about 2-3 hours.  After the dough has chilled, roll it out to about 1/8″ thickness (if you want thicker, bigger doughnuts, roll out the dough to 1/4″ thickness).  Cut with a floured doughnut cutter.  Definitely dip the cutter in flour in between cuts.  Re-roll out the dough as necessary (or reserve the centers for doughnut holes).

Keep a slotted spoon handy.  Clip the thermometer to the side of a deep pan and add shortening and heat until the temperature reaches 365-370º.  Very very carefully place the dough into the hot shortening.  With the slotted spoon, turn over the doughnuts after about 45 seconds to 1 minute and cook for another 45 seconds or so.  With the slotted spoon, remove the doughnuts and let drain on paper towels.  Repeat with remaining doughnuts.

The Icing: As the doughnuts cool, prepare the icing by beating together the confectioner’s sugar, milk and maple extract.  Drizzle over the doughnuts.  Best served warm or at room temperature.

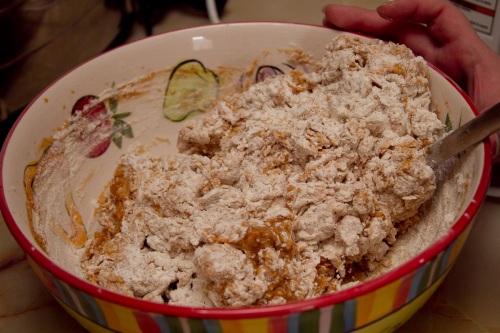
Incorporating the flour into the pumpkin mixture

Incorporating the flour into the pumpkin mixture

Rolling out and cutting the spiced pumpkin doughnuts

Rolling out and cutting the spiced pumpkin doughnuts

Frying the pumpkin spice doughnuts

Frying the pumpkin spice doughnuts

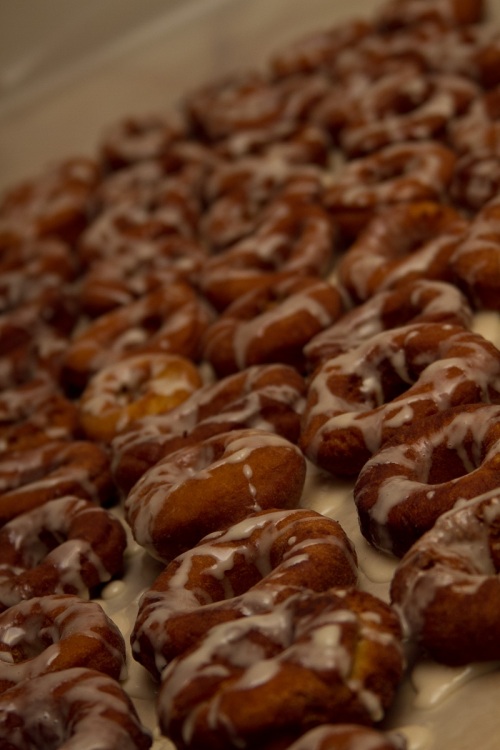
Pumpkin spice doughnuts with maple icing

Pumpkin spice doughnuts with maple icing

1 Comment

Filed under Baking, Desserts, Party Food, Recipes, Tidbits

How to Clog Your Arteries Part 1

For the past couple of years, one of my friends has thrown a Bacon Party.  (She’s evil, but obviously well-loved.)  If you don’t know, a Bacon Party is a potluck party featuring only foods that contain bacon (or fake bacon for the vegetarians).  Each year I gain at least 3 lbs from this party.  Let me tell you – it’s totally worth it.  This year I made a couple of dishes to add to the melee — bacon cheddar knots and a pumpkin pie topped with walnuts, brown sugar and, of course, bacon.   Sadly, Mr. Kitchen had to miss the party because he was working.  Luckily I came home with two giant Tupperware containers filled with treats.  (I know, I’m totally evil, but if I’m not gonna fit in my wedding dress — he’s not fitting into his kilt.)

The cheddar bacon knots were surprisingly easy, though in preparation for that and the pie, Mr. Kitchen and I fried up an entire package of bacon.  I could feel the cholesterol and fat seeping into my pores — kinda gross, but damn tasty!  For any of you who are thinking that a bacon party is a brilliant idea, it is, but I would recommend starting on some sort of cholesterol medicine now, followed by lots of fiber.   On the plus side (like bacon needs another plus side), at least I couldn’t actually feel the presence of my gallbladder after this year’s party.

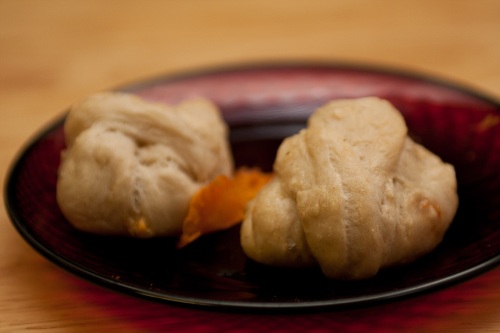
Bacon Cheddar Knots

Bacon Cheddar Knots

Bacon Cheddar Knots

Knots Dough (Adapted Heavily From Nick Manglieri)

4 cups all purpose flour

2 teaspoons salt

1 packet active dry yeast

1 2/3 cups warm water

3 tablespoons olive oil, plus oil to coat a baking (jellyroll) pan

3 baking (jelly roll) pans

Bacon Cheddar Filling

3/4 package bacon, cooked

1 8 oz package cheddar cheese (or any cheese you prefer)

Egg wash (1 egg, mixed with about 1 tablespoon water)

Combine flour and salt in large bowl.  In a separate bowl, mix yeast into water and let stand for a few minutes until the water fizzes a bit (stir if it doesn’t begin to fizz). Whisk oil into water/yeast mixture.  Make a well in the flour and pour water into center.  Using a rubber spatula, begin to fold the flour into the water center, gently incorporating and mixing outwards until all of the flour is combined.  The dough will be very soft.  Cover the bowl with plastic wrap and let sit until the dough has risen to double its size (approx 2 hours).  After the dough has risen, scrape it into an oiled jelly roll pan.  Lightly oil your hands and press the dough into the pan so that it is evenly filled. Cover the pan with plastic wrap (oiled) and let the dough rise again, approximately 1 hour.  While the dough is rising, cut the 8 oz block of cheddar into approximately 2 dozen pieces.  After the dough has risen for the second time,  use a pizza cutter to cut the dough into approximately 24 squares (6 length wise, four depth wise).

Preheat the oven to 350º. Cover 2 baking pans in foil and lightly grease.

Take a square of the dough and place about half a strip of bacon and 1 piece of cheese in the center.  Fold two of the opposing corners over each other.  With the other two opposing corners, twist them together, forming a knot on top.  Place the piece in the pan.  Repeat with remaining 23 pieces of dough.  Brush all of the knots with the egg was and bake for about 20 minutes, or until golden.

Bacon Cheddar Knot Dough

Bacon Cheddar Knot Dough

Bacon cheddar knot dough

Bacon cheddar knot dough

Bacon Cheddar Knots

Bacon Cheddar Knots

Bacon cheddar knot dough

Bacon cheddar knot dough

Finished bacon cheddar knots

Finished bacon cheddar knots

2 Comments

Filed under Appetizers, Baking, Party Food, Recipes, Tidbits

Mama Kitchen and The Universe Giving Back

I admit, I have been totally delinquent in my blogging, BUT! there has been good reason.  Mama Kitchen had surgery this week — everything went smoothly, but I wanted to be here to help take care of her and to help out during the recuperation.  So yes, delinquent blogger, but, also, good daughter.   I think these things even out.  Apparently, the universe has seen fit to reward me today and I couldn’t be happier.  You see,  I just won a gift certificate to Williams Sonoma.  (Did anyone else just hear a choir of angels? Cause I sure did.)  And who, you might ask, is the fairy godmother who hath bestowed this unbelievably good fortune?  It’s Merci New York, this fantastic resource for chic, sophisticated stylish brides.   And while Merci can plan any sort of event, their blog (Merci New York Blog) is an absolute must-read for brides.

Now – on to the recipes!  Mama Kitchen chose this next one, but it’s really a perfect fit with our recent focus on fall produce.  It’s getting chilly down here in South Carolina and the perfect cure for that? Chowder. Specifically — Chicken and corn chowder.


Chicken and Corn Chowder

2 chicken breast cutlets (I’m sorry, I forgot to weigh them), cut into cubes

6 cups chicken stock

2 15.25 oz cans of corn, strained

3 celery stalks, diced

6 small russet potatoes, chopped into chunks

1/2 medium onion or 1 small onion, diced

2 green bell peppers, roughly chopped

1 cup heavy cream

1 tsp dill

1 1/2 tsp thyme

1/2 tsp salt

1/4 tsp pepper

1 tsp olive oil

2 tbsp flour

In a large soup pot, heat the oil and saute the diced onions until soft (about 3-4 minutes).  Then add chicken and cook together with onions over medium heat for about 3-4 minutes.  Add celery, green peppers and spices.  Cook for an additional 5 minutes.  Add chicken stock and bring soup to a boil.   Let cook over medium-low heat for 20 minutes.  Ladle out 1 cup of the boiling broth into a bowl (or measuring cup).  Slowly stir in the 2 tbsp of flour.  This will help to thicken your soup.  After the flour has been completely incorporated into the broth, return the mixture to the soup pot and stir in and mix completely.  Add potatoes and corn.  Let cook for another 20 minutes, or until potatoes are tender.  Add heavy cream, and mix into broth.  Let soup simmer for an additional 5-10 minutes.  (Note, you can also use corn starch in place of flour to thicken the soup.)


Diced potatoes for chicken and corn chowder

Diced potatoes for chicken and corn chowder


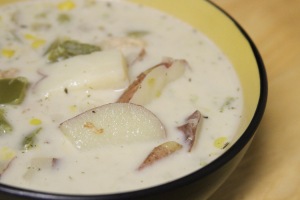
Chicken and corn chowder

Chicken and corn chowder


Chicken and corn chowder

Chicken and corn chowder


3 Comments

Filed under Chicken, Dinner, Recipes, Soups and Stews, Tidbits

Welcome, Fall

The weather in New York City has been glorious this past week (except for that whole freakish Tornado thing).   I’ve talked about how much I love this season, when it starts getting chilly and people buy new school supplies — I love the promise of an empty notebook!  Fall is also the season when Mr. Kitchen and I truly fell in love, so this season has all sorts of super happy memories for me.   One of our best dates was going to some of the OpenHouse NY sites.  Each year in the fall, there’s an “Open House NY” weekend, where sites that are generally not open to the public open their doors for everyone to visit.  We got to visit the garden rooftops surrounding Rockefeller Center and the Mason’s lodge in the city.  I love exploring the city and I was so so happy to discover that Mr. Kitchen did too.

Another reason to love fall?  The produce choices available in this season just can’t be beat.   So in honor of this fabulous time of year, where there are Apples! Pumpkins! Squash! All sorts of root vegetables! I thought it might be nice to focus on fall produce recipes for the next few weeks.

First up?  Apples.

Most people have an apple pie recipe, but apples make such a fabulous addition to all sorts of foods.  I’ve seen it added as a last step in stews, had it chopped and roasted with onions and celery with chicken, and all sorts of other mix-ups with turkey and other proteins.  My newest favorite is adding to it to a pork roast.  Actually, it’s more like adding a bourbon-infused apple pie to pork roast.

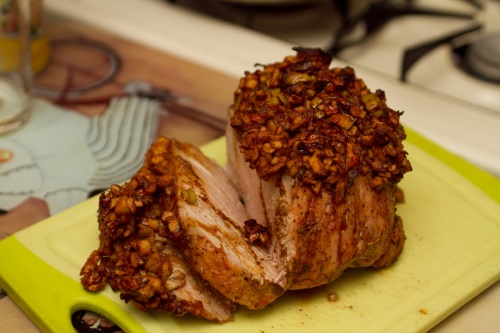
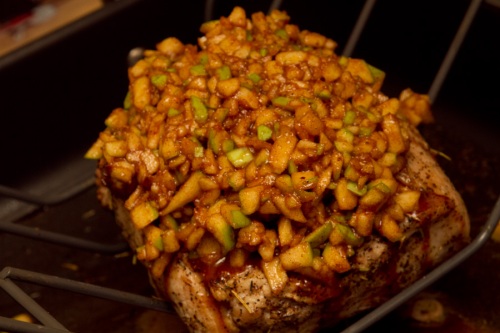
pork roast with brown sugar bourbon apple topping

pork roast with brown sugar bourbon apple topping

Pork Loin with Apple Bourbon Topping

The rub

2 lb pork loin

1 tbsp salt

pinch cayenne pepper

generous pinch thyme, pepper and rosemary

2 tbsp olive oil,  another 2 tbsp for searing

The topping

1 apple (I like Granny Smith), finely chopped

1 tsp vanilla extract

1 tsp lemon juice

1/2 cup brown sugar

2 tbsp  cinnamon

1/2 tsp nutmeg

3 tbsp Bourbon (your choice, but a word to the wise — if you wouldn’t drink it, don’t cook with it.)

A roasting pan

Preheat the oven to 325°

Mix together dry rub ingredients (salt, cayenne, pepper, etc.)  Rub down the pork loin with about 2 tbsp olive oil and then rub on dry ingredients.  Let stand 10 minutes.  In a pan large enough to fit the roast, heat the remaining olive oil.  Sear the roast on all sides, about 2-3 minutes per side.  (For a good tutorial on searing, see here)

Once the meat is seared, place it in the roasting pan.  I like to use roasting pans that have an elevated roasting rack.  I also add water to the base of the pan, as an extra insurance that the meat will remain tender.  Cook the roast in the oven, uncovered, for about a half an hour.  (You’ll be adding the topping to the roast and will be returning it to the oven.)

To make the topping, finely chop the apple and add the lemon juice.  Add vanilla, brown sugar, nutmeg and bourbon.  Stir together well.

After the roast’s initial 30 minute cooking period, remove from oven and pile the apple topping on top of the roast.  Return to oven (make sure there’s still water in the base of the pan!) and cook until the center of the roast reaches 160° .  Generally, this takes about 40 minutes per pound, but I’ve found that using this topping makes the roast cook a bit slower.   We’re also cooking this at a slightly lower temperature, to let the apple flavoring soak into the meat.  If you’re shorter on time, a good guideline is 350° and 30 minutes per pound.  Let roast stand for 10 minutes before carving (it allows the meat to firm up to make slicing easier).

pork roast with brown sugar bourbon apple topping

The pork with the olive oil and herbs rub

pork roast with brown sugar bourbon apple topping

Searing the roast

pork roast with brown sugar bourbon apple topping

Pile the apple mixture on top of the roast

pork roast with brown sugar bourbon apple topping

Cooked and sliced pork roast with brown sugar bourbon apple topping

1 Comment

Filed under Baking, Dinner, Pork, Recipes, Tidbits

Lighten Up

As you may have noticed by the photos that accompany the recipes I’ve posted, I cook (and inevitably eat) everything that’s included on the blog.  So, while all the stick to your ribs food I’ve been posting has been an absolute joy to make and eat, my Wii Fit Mii has been looking pretty shameful lately.  Yes, that’s right, I’m being shamed by the Wii Fit.  My Mii has been looking pretty dejected this week and the game system keeps playing that “doh doh doh doh” “you lose” music, so I’m thinking this is a bad sign.  Everything in moderation right?  So next up is a delightful, light and actually good for you Herb Crusted Salmon.

Herb Crusted Salmon.  Is it just me or does that just automatically sound just a bit more sophisticated than your average mid-week meal?  Luckily, this recipe is incredibly easy and takes less than 20 minutes total to prepare.

herb crusted salmon with white asparagus drizzled with a balsamic parmesan vinaigrette

I paired the salmon with a white asparagus drizzled with a balsamic parmesan vinaigrette and dinner rolls

Herb Crusted Salmon

2 Salmon steaks (approx 3/4 lb)

2 tsp basil

2 tsp thyme

1 tsp oregano

1 tsp rosemary

2 tsp flour

pinch salt

pinch pepper

pinch tarragon

Olive oil to drizzle on salmon

Pre-heat oven to 400º

Rinse salmon fillets.  In a bowl, mix the herbs together in along with flour.   Cover a jelly roll pan with foil.  Drizzle a little bit of olive oil on fillets, enough to just coat the top surface of the fillet.  Dip fillets oil-covered surface down into mixture of herbs, pressing gently to coat the surface.  Place fillets on pan.  Drizzle again with a bit of olive oil.  Bake for approximately 10 minutes.

White Asparagus with Balsamic Vinaigrette and Parmesan

Half a bunch of white asparagus, rinsed

1 tbsp olive oil

1 tbsp Balsamic vinegar

1 tbsp Dijon mustard

1 tsp salt

pinch pepper

2 tbsp Parmesan cheese (shaved)

Rinse and trim asparagus.  In a shallow pot, blanch asparagus spears over medium-high heat for approximately 3-5 minutes.  Remove from heat.  In a bowl, mix together oil, vinegar, salt, pepper and dijon.  Drizzle or toss with asparagus.  Top asparagus with Parmesan.

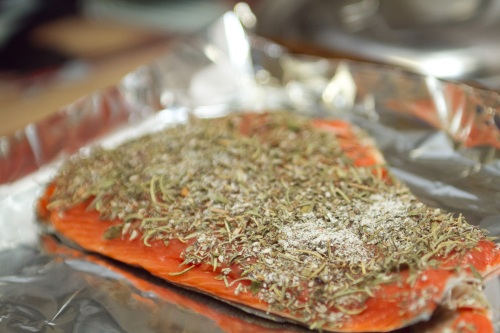
Pre-cooked salmon topped with herbs

Raw salmon topped with herbs

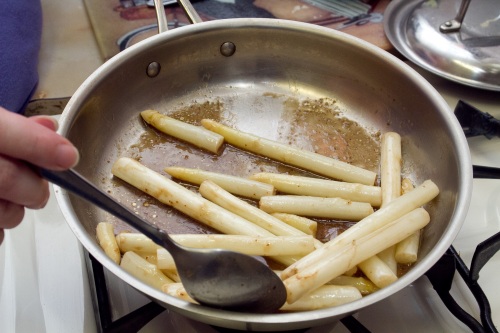
Mixing the white asparagus with balsamic vinaigrette

Mixing the white asparagus with balsamic vinaigrette

Herb crusted salmon with white asparagus drizzled with Balsamic vinaigrette and Parmesan

Herb crusted salmon with white asparagus drizzled with Balsamic vinaigrette and Parmesan

2 Comments

Filed under Dinner, Fish, Recipes, Tidbits

Graduating from the Barbie Kitchen

My old kitchen was what we affectionately termed a Barbie kitchen.  Literally the size of a dollhouse kitchen, it came complete with a mini, under-the-counter size fridge and an Easy-Bake Oven.  I have no idea how I ever cooked things there — I had one square foot of counter space.  Let me repeat that.  ONE SQUARE FOOT.  It was a galley kitchen you had to turn sideways to walk in.  But I was single, so it was perfect for me.  I had the unicorn of NYC real estate –a backyard — and I threw summer dinner parties and bbqs.  But it came with lots of cooking complications.  Like my freezer not working.  And the fact that I could fit absolutely nothing in my fridge.  And ONE SQUARE FOOT OF COUNTER SPACE.  Can you imagine rolling out a pie crust in one square foot of counter space? Or making lasagna? Or chopping, well, anything?!?  My stove was no better.  I couldn’t fit a standard size roasting pan in there.  I had to get itty bitty cookie sheets.  The one blessing of that kitchen — it forced me to cook nearly every day.  I couldn’t fit leftovers in my fridge!

Truth be told, I learned a lot about myself living and cooking on my own.  I learned that I could never ever date someone who didn’t love food and who didn’t love my cooking.  My husband-to-be, who I met while in that apartment, became my ultimate taste-tester and sometimes regretful guinea pig.  I would venture to say he might have fallen in love with my lasagna and my cheesecakes before he fell in love with me, but he disagrees.  It’s with him that I’ve finally graduated to a Big Girl Kitchen, complete with ten times the counter space of the Barbie Kitchen and a real, life-sized refrigerator and oven.  I can cook whole meals in there!  So here’s me, cooking my way through life, love and everything in between.

2 Comments

Filed under Tidbits